I'm please to announce a number of new features which were released throughout September, all based on valuable user feedback. Read on to learn more.
A long running sequence can now be cancelled from another sequence using the stop sequence step. An example of where this is useful would be if a motion sensor turns on a light, then pauses for 5 minutes before turning off the light. If the motion sensor is triggered again and you want the timer to restart, you would stop the original sequence next time the motion sensor fires.
Sequences can be triggered via email using the new email trigger. Send an email to the SEQUEmatic email trigger mailbox as you're leaving work and kick off a sequence to adjust your heater, turn on the outdoor lights and prepare your home to welcome you.
This is also a useful way of integrating external services that don't have a webhook into your sequences, as any email can be forwarded to the SEQUEmatic email trigger mailbox to trigger your sequence. You could try changing the colour of a light when you receive an email from Amazon announcing a parcel is arriving today.
It's been possible to check if a variable contains a value since February this year, but now you can also check that a variable does not contain a value. This has been added to the variable value condition. This is particularly useful if you receive a long string from something like a weather service and want to ensure it doesn't contain text like cloudy.
As always, if you have any feature requests or feedback let me know via the Q&A forum or the contact page.
The year is flying by, and as the month of August comes to an end there have been a lot of updates to SEQUEmatic including a new trigger, a new variable webhook, improved sequence logging and enhancements to the landing page and Q&A site. Read on to learn more.
Trigger sequence periodically
Previously you could schedule a sequence to run every hour or every minute, or at a set time of day. Now you can set it to run every x hours or x minutes, for example every 2 hours or every 10 minutes. This gives more flexibility around when time based sequences run. You can learn more here in the docs and if you ask the bot he will be able to help as well.
New variable webhook
A new webhook allows you to check the value of a variable remotely. You can read more about variable webhooks here. This new webhook will return the current value of the specified variable in plain text, allowing you to reference variables in external services as well. I’d be very interested to hear how you’re using this feature!
Email notifications
SEQUEmatic doesn’t send a lot of email notifications, but now you can manage your email preferences from the settings page. Settings are at the individual notification level so you can select which emails you do and don’t receive.
New sequence dashboard
When you log in to the site, you’ll notice a new dashboard. This makes it easier to find important areas of the site like your settings, variables and linked services without having to navigate through multiple pages to get there. You can also see all your sequences at a glance, and turn them on and off with the click of a button.
Also on the dashboard there are some interesting stats summarised at the bottom of the page, and a new statistics page to give you a detailed breakdown of the sequences which ran each month. You may have noticed this report has started to be emailed monthly, and now you can navigate through your stats back to when you first started using SEQUEmatic.
Step history updates
Previously the sequence logs could be a bit difficult to interpret, and if you wanted to check on conditions which ran there was no detail to show how a condition passed. The sequence logs have had an overhaul and now provide a lot more information, including the value of variables and weather conditions at the time the sequence ran so you can better understand why steps ran and debug more complicated sequences. If you have any feedback or would like to see additional information in the logs, let me know.
New and improved Q&A site
The Q&A site has also had an overhaul. Previously this was separate to SEQUEmatic, making it confusing if you had registered an account there as well. Now, you can post questions and answers from your existing account, and there is even better spam protection than before. Not only that, but if the SEQUEmatic bot thinks something in the forum may help with a question you’ve asked he’ll give you a link to that question!
You can go directly to the Q&A site here and also from the general help page.
As yet another month comes to a close, there have been quite a few updates at SEQUEmatic.
Following on from the success of the Tuya Smart Life integration, you can now link directly with eWeLink to control your eWeLink and Sonoff devices from your SEQUEmatic sequences. Direct integrations to SEQUEmatic are proving popular, so if there are any other services you’d like to see added please post in the comments below, the Q&A Forum or contact me directly.
Next, you may have noticed the live chat icon in the bottom right corner has recently changed. If you click that button you can now chat directly with the SEQUEmatic bot! Even though he’s busy running your sequences, he can always find time for a chat to help you work your way around SEQUEmatic so go ahead and ask him your questions.
The bot works best if you ask questions like you would to a person, and has some context of what you’re currently doing. For example when you’re editing a step you can ask him questions about that particular step and he’ll explain how to set it up. If he’s not able to help, he will offer to transfer your chat to me so we can chat in realtime.

Expanding on the features available in sequences, weather triggers and conditions are now directly built into SEQUEmatic. Previously you had to go via IFTTT which could be quite complicated, but now you can check the temperature, wind, rain and many other conditions directly from within a sequence. The weather can either trigger your sequence or you can use it within a sequence to check conditions before proceeding.
There are a lot of options available in this new step type, so be sure to check the docs for the full details.
Finally, an update has been made to the way sequences are logged. Navigate to the sequence log and click the magnifying glass next to the sequence to you want to view in detail. Previously the log showed you the steps which ran, but now it also provides information on the value of variables and other elements of the sequence as they were when the sequence ran. This can be very helpful in debugging your sequences. Note that this only applies to sequences which ran from now onwards – any sequences which ran prior to today will still display in the old log format.
Well, that’s it for this month but more is on the way! As always, post your questions and feedback in the Q&A forum, ask the bot your questions or contact me directly if you need help.
Sometimes you want an IFTTT applet to only run once every hour, but this can be tricky when there’s only one condition available in the applet. Paired with SEQUEmatic, you can limit your IFTTT to run only once per hour (or day or any other frequency you’d like)!
We’ve built a shared sequence to help get you started, so click this link and import it into your account. Then, we’ll take a look below at what this sequence does as well as the settings you need in IFTTT to make it work.
Let’s run through the sequence step by step:
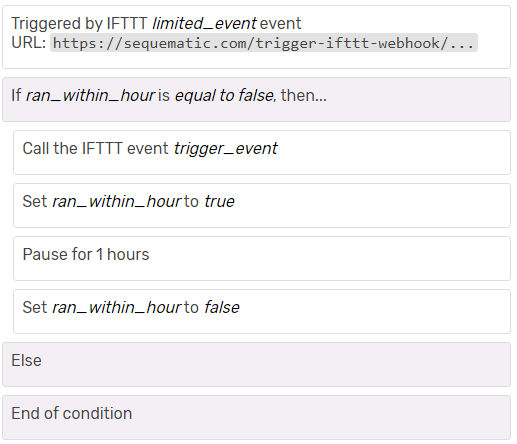
ran_within_hour and only continues if it is false (ie it didn’t run in the last hour)ran_within_hour is set to true so that the condition in step 2 will fail if the applet fires again in the next hourran_within_hour is reset to false so that if the applet is triggered again the sequence can runTo get this running, you will need to create two IFTTT applets which are described below.
You probably already have a working IFTTT applet and this is what you’re wanting to limit to once an hour. We’re going to break that applet into two separate applets, with the SEQUEmatic sequence in between.

Your IF THIS applet can have any type of trigger. In this example we’re going to use the location applet when I enter a certain area. The important part here is the THEN THAT component which will use the webhook service to make a web request. When setting up the web request you only need to provide the URL. This should be copied from the trigger step in your SEQUEmatic sequence. Leave everything else with the default settings. You can view the full applet here.

You will need to create a second applet to take care of the THEN THAT component. Here the trigger should be the webhook service when it receives a web request. The event name should match the event name in step 3 of the sequence. In our example this was trigger_event. You can use any meaningful name here, as long as it matches in both IFTTT and SEQUEmatic.
For the action you can use any other IFTTT service – this would be the THEN THAT step from your original applet. I’m going to have it turn on my Philips Hue balcony light. You can view the full applet here.
That’s just about it. Be sure to enable both your IFTTT applets as well as the SEQUEmatic sequence. If you haven’t used IFTTT with your SEQUEmatic account before then you’ll also need to set up your IFTTT key in your account settings. You can read more about this here.
Finally, if you want to use this for multiple IFTTT applets, you will need to use a different variable name otherwise the sequences will interfere with one another. You can just duplicate your sequence, or import the template again, and modify the variable ran_within_hour in steps 2, 4 and 6 to any other variable name.
If you have any questions, post in the Q&A forum, leave a message in the comments below or contact me directly. Happy automating!

Following the positive reception of the Tuya Smart Life integration last month, I’m please to announce you can now also control your eWeLink or Sonoff devices directly from sequences. Read on to learn how to link your account.
Login to your account and navigate to the linked services page. Here’ll you find a number of services which are available to link to your account. Click Link account next to eWeLink / Sonoff to begin.

You’ll be taken to a page where you should enter your eWeLink credentials. Either your email address or phone number is required, depending on what you used when creating your eWeLink account, along with your eWeLink password. Once you’ve entered your credentials, click Authorise to link your account.

You will be redirected back to the linked services page, and it will show that your eWeLink account has been refreshed. If at any time you no longer wish to have your eWeLink account linked to SEQUEmatic, simply click unlink account to break the connection.

Controlling eWeLink devices from your sequences is simple. Just select smart device from the list of step types and a list of available devices will appear. For a single channel switch, there will be only one property which is switch, however others may have more than one channel which you can select.
In general, the only action available is to turn the device on or off. Click save once you’re done and you’re ready to go!

As always, if you have any questions post in the Q&A forum, leave a message in the comments below or contact me directly.